Monday, April 6, 2015

Bra / Halter Top From Left Over Jean Legs

I had a pair of jeans that were ripped in the front, and I was a little to violent with them which resulted in giant hole. So of course I made myself a nice pair of cut off shorts. I didn't feel like throwing away leg tubes so I thought of making some sort of top with them. This is the final Product:

`


I made the pattern myself, getting ideas from the web and using a bra as a basis. As you can tell I kinda have big boobs so the regular triangle doesn't look too good on me. Below is a picture of the shapes that I used. The straps go around my  neck. I actually sewed everything by hand since I don't have my sewing machine here but it didn't take too long, just a little sub par quality. Since this is following a bra pattern the bottom piece fit tightly, this means that you have to have some sort of opening at the back. What I did was to use elastic I had lying around, a little tight when pitting it on but it works.

I actually made everything twice, once with a cheap cloth I had lying around to get the measurements right, then with the jeans.


For the bottom piece, I traced one of my bras on a piece of paper and made sure that it fit with the cup I was making. I had to extend it a little further (you can see the notch in the picture,


Overall I think it was a pretty good use of a pair of jean legs that were going to be tossed. I can see a lot of possibilities with this pattern or even this top. You could alter it into a longer shirt, add some clasps or a zipper. It could even be decorated like those bras people wear to dance concerts. Endless possibilities.

I'm going to try to see how well other types of fabrics work with this pattern, 

~Fifi 


Tuesday, July 30, 2013

Crochet or Knit Rectangle Sweater/Shrug

I have seen some pictures of a cute sweater that crosses over in the front. This is very simple and can be made in a weekend, using any size or type of yarn, it's just a rectangle. The 9 inches comes from taking half of the length from the bottom of the neck to the hip (or wherever you want it to end).

Monday, July 8, 2013

Crochet Moccasins/Loafers

I wanted to make a pair of shoes and found this pattern on ravelry, made it once and then went back a made it again with some modifications.


I used a size F hook
The yarn I used was cotton, Red Heart, not sure exactly of the name, 2 skeins 

This is smaller than what the pattern asks for so:
-add 1 ch to the staring row of the sole
-Sc 8 rows along the side 
Here are the modifications I made
-Make the flap longer (start with 1 less ch than in the pattern, also no back look only row, about 20 rows total)
-Make a row of sc around the flap before attaching it, looks neater
- increase rows on the heel, as show. 5 stitches on each side (double the picture)
-Decrease the st so that it is sloped at the heel
-> Each row sc2tog at the end of the hill, more or less if necessary
-Along the top, for a braid/ribbon, sc, skip1 chain1, sc. Thread a cord through this

To join the top to the sides, it becomes easier with the sc on the flap
Just line them up right sides out and sew in and out like in the diagram
I start at the middle and leave a long thread to go back and do the other side, that way I know that it is centered.
Eventually I want to make a sole (same pattern) out of either twine or plastic and sew it on so that I can wear them outside and not just around the house.
~Fifi

Sunday, July 7, 2013

Overview - Small Antler, from knitting to crochet

For the person on reddit asking for help I took a couple pictures of something I worked up to look like the antlers in your pattern.
I made this with the only yarn/needle I have right now (on vacation)  so I would definitely use smaller yarn and hook but the concept is the same 
Start of the with a chain in the round
 Build up, in rows not spiral. Here I decreased 2 times on the middle row. If you are making it with smaller yarn/hook then you will want to decrease more often.
 When you get to where you want the first antler to start then do not finish  all the row (I skipped 2 st) and turn to crochet. Do this until it is as tall as you want (I did 2 rows). Again, if smaller yarn, more stitches.
 When you get to where you want it to be, chain and join. So in my case ch 2.
NOTE: the difference between the last picture and this one is only the ch 2
 Decrease as you want, and repeat the hole-making procedure.
Decrease until you have only a few st left and pull through them and fasten off
(My yarn is was too thick and hook to small to do this right but with smaller yarn this would look more pointy)

 Cast on around the holes (you can take this as an opportunity to decrease as well if you want. I started working in a spiral because why not
 Single stitch around, decreasing when you want, again make the tip as small as possible.
I didn't do the 2nd one because it is literally the same proccess.

Hope this helps
~Fifi

Wednesday, July 3, 2013

Little Filet Crochet Bag/Pouch

It was a co-workers birthday so I decided I wanted to make a litle bag for her. Initially I wanted to go with Victorian-esque vintage look but I could not find any nice patterns,  So I decided to go with her love of cats instead.
In this post I will give the pattern for the pouch as well as how to sew the lining inside.
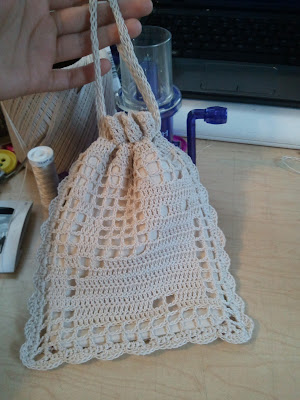
Here is what it looks like:


 I worked this in simple filet crochet, if you don't know what that is this is a good source, it is working in little squares which you can choose to fill in or not.
What you need:
Size 10 thread
Size 2 steel crochet hook
Needle and Thread
Fabric (I used muslin) 
No embellish knit, i replaced the cords with a braid 

I made the pouch 14 squares long and 18 high.
I started from the top of the picture side and continued to make the back side at the same time (ended with 14x36)

Here is the cat I used, I get it from somewhere online but I could not find it again so I recreated it

I had no idea how to do the triangles so I don't know if this is the proper way, but I crocheted 4 dc into one st, like this:

When I had finished the rectangle I did not cut off the end but just folded it in half and started joining it from the top.
To join: sc 2 in gap (chain/dc) , 1 sc in the row.

After the round of sc's, go back with the shell stitch, dc5 in one st, skip 2, sc, skip2, 5dc...
It was off by maybe 2 stitches so I shortened 2 skip2 spaces into skip1, only do this if necesarry   

Once this is done go in with single a row of single crochet (2 in space, 1 in dc) , ignoring the shells
2 rows of dc 
1 row in filet, with every other one filled
2 more dc rows
Shell stitch up top
Fasten off.

BLOCK
Pin it down (I used a pillow) while stretching it at the same time, take an iron and put it on the highest steam setting, go over it with the steam, you don't actually have to iron it down


To  make the inside:

Measure out what size you want it to be, add a half inch on every side that you are going to have a seam 

Sew 2 rectangle together (use one big one and fold in half if you can so you only have to sew 2 side. Leave about enough space at the top to make another seam. Make 2.
To sew them together so that there are no visible seams you want to have the right sides together on the inside (Turn 1 right side out and put it inside the other)
Sew the top seam together, but make sure to leave a hole so that you can turn it right side out. 
Once you have turned it, sew up the hole left over, it should look like this:
Iron it down, so that it looks presses and more professional.

To sew it in I used the method from this tutorial, using the 1st sc row at the top  

I ended up going with braids, not the i-cord seen in the picture, but you can use anything ribbon etc. 
Weave in a cord so that it hang out of one side, do to the same with the opposite side, this way when you pull on both sides it closed up nicely,

Final Notes:
-You can use any design, just get a piece of graph paper and  play around
-I should have used more contrasting thread and fabric combination to see the picture a little better
-I would have made it a little bigger, this in only good for maybe a cell phone and a small wallet
-I'm going to add a strap so that it becomes an over the shoulder purse 

Hope this was helpful
~Fifi

Sunday, May 12, 2013

Cute Crochet Ring Using the Slip Stitch

So this project is fast and simple, its a crochet ring. It is made with back loop slip stitches. The flower on top is made with double crochets and slip stitches. (Sorry I used white, its a little hard to see but it's the only color in this size that I had)

To start I used size 10 cotton thread and a size 4 steel crochet hook.

This is how we want to start (instead of a knot) when working with slip stitches. Remember to leave some extra thread for later use. 

Chain until its long enough to wrap around a finger (give a little extra because it tightens up a little). The first row is worked differently then the rest. Turn the chain over so that it looks backwards, and insert the hook into the the middle lump. Slip stitch the entire row.

 Once you are done with the first row, the place where you insert the hook changes. This will be continuous. You want to insert the hook into the back loop of the chain shown below. Continue with the back look slip stitch until the ring is as long as you want it.

Finish when you started, remembering to leave so extra thread

Take the threads and knot them on the inside to get everything out of the way 

The flower it really simple:
Chain 1 
In the first chain: dc, sl st, dc, sl st, dc, sl st, dc, sl st, dc, sl st, finish off 

I colored it with nail polish because I didn't have any other colors. It worked very well, even made it more stiff. 

Tie the flower into the front (across from where the ring was started and ended) with a simple knot at the back.

Here is the finished project. 

Thanks for reading!
~Fifi 

Hey Everyone!

I'm new to blogging but I intend to blog mostly about crocheting. Sometimes I am  trying to makes something and find absolutely no references online and have to figure them out myself. I plan to start documenting all my projects and providing lot of directions for them. This might take me a while to figure out but hopefully this will be helpful to lots of people!

~Fifi